
The SSD Review SSD Optimization Guide is one of the Internets most popular SSD Resources. It contains several proven techniques which will ensure that your SSD remains in top shape as well as showing the readers methods of regaining some of that valuable SSD storage space lost during the installation process.
.
Many of the suggested optimizations will, not only guide the reader through the process, but also, explain the intent of the optimization and any benefits or pitfalls that may accompany it.
In short, The SSD Optimization Guide is intended to educate the reader with respect to SSDs in order to allow each to arrive at their own educated decision as to what optimizations should be completed for their respective system.
READER ALERT!!!
There is no need to Optimize Win7 or your SSD whatsoever for it to function correctly. The reader retains sole responsibility in their following of this thread and The SSD Review and its authors shall not be deemed liable for any damage that may occur to the readers computer or its hardware in following this thread.
Graphics in this guide have been reduced to assist the reader and simply clicking on each will enlarge them to their original size for better viewing.
————————————————————————————————————————-
1. ENSURE YOUR COMPUTER IS OPERATING IN AHCI MODE.
PREFACE: Skip this technique if your bios states your system is in AHCI mode. As uncommon as this may seem, not all computers will automatically install a SSD in AHCI mode and the end result will always be a reduction in performance if the system is running in IDE mode. AHCI mode allows for plug and play installation of SATA devices and Native Command Queuing which can provide as much as a 10-15% performance boost in single drive systems. A system being set up in IDE mode is a common occurrence with those completing their first computer build who have not first educated themselves and properly set up their bios settings.
WARNING: Double check that you have AHCI in your mobo BIOS before changing. You will NOT be able to boot into IDE mode after changing this setting. This site claims no responsibility for any modifications made as a result of advise afforded herein.

.
.
.
.
1. Hit the Winkey + ‘R’ to get you to the ‘Run’ menu.
2. Type ‘Regedit’.
3. Select the file path:
“HKEY_LOCAL_MACHINE\SYSTEM\CurrentControlSet\Services\msahci”
4. Right Click and modify Start from 3 to 0 and Restart.

.
.
.
—————————————————————————————————————–
2. ENSURE CHIPSET DRIVERS ARE UP TO DATE.

Ensure your Chipset drivers are up to date by checking with your system or motherboard manufacturers website and seeking the support and drivers page. This will allow for the efficient managing of data transmission through the SATA bridge and newer drivers may also be released to solve problems discovered with the system after its release.
.
.
TRIM is a very important part of ssd maintenance and allows for background wiping of previous deletions to retain ssd performance. There is an AHCI driver which is a standard part of Win7 and Intel has finally released a new driver here which is also TRIM compliant.
 Although both drivers are fully capable of allowing TRIM to pass to the hardware, testing has shown that the new Intel driver provides performance improvements to RAID. There are numerous documented tests that show that the new drivers perform ‘wiping’, similar to TRIM’ almost immediately after a deletion is made on a RAID drive, thus restoring performance.
.
This step may be unnecessary to most as many tests have resulted in no appreciable performance difference between the standard MSAHCI driver and that put forward by Intel.
————————————————————————————————————————
3. DISABLE SYSTEM RESTORE.
If you didn’t take our advice in step 1 and start with a clean install, this is the point at which you should copy the contents of your old user profile into your new directory. Rather than doing a wholesale copy/paste of the whole directory, it’s safer to only pull the files you need.This is the most important piece of information in this Guide. Recent testing has discovered that System Restore allocates restore points within many SSDs that do not work well with the SSD or TRIM. Typically, System Restore will degrade SSD performance significantly within a few weeks and makes it very difficult for TRIM to function. Disabling System Restore is not only recommended throughout the web, but also, Intel has lately also included this advise with respect to its ssds. Disabling System Restore will also return to you a fair amount of ssd storage space. The SSD Review has published an article here which documents the event and also provides a simple test process to determine if System Restore may be affecting your SSD Performance.

1. Right click on My Computer and select Properties;
2. Select System Protection;
3. Select Configure; and
4. Select Turn Off System Restore.
————————————————————————————————————————
4. DISABLE DRIVE INDEXING
The purpose of drive indexing on a hard drive was to allow quicker access to a file. As access times on a ssd are almost instantaneous (.1ms), there is a common belief that indexing does nothing more than increase the total number of writes to the ssd which results in a lesser life cycle. Having stated this, there is no confirmed performance increase by disabling indexing and the chances of wearing out ones ssd is somewhere in the area of impossible to one in a million.

1. Go into My Computer;
2. Right click your SSD and select Properties; and
3. Un-check the box marked Allow files to have contents indexed in addition to file properties. If it asks for administrative permissions allow it to do so.
A popup may appear stating an error applying attributes has occurred which is normal. Select ignore all and it will continue. This process will take about 2 minutes.
————————————————————————————————————————
5. DISABLE DRIVE DEFRAGMENTATION SCHEDULE
Windows 7 should, by default, disable Windows Defrag automatically but this does not always occur for some reason. Disk Defragmentation is not required in a ssd as the mechanics are completely different. There are no moving parts so file fragmentation doesn’t occur as frequently as it does with a hard drive which fragments files as they are retrieved and stored on the disk while it spins at very high speeds. Leaving Windows 7 with an enabled defragmentation schedule will drastically increase your ssd total writes and decrease its lifespan.

1. After finishing indexing, select the Tools tab;
2. Select the box Defragment Now;
3. Select the box Defragment Schedule; and
4. Un-check the Run on a Schedule Box.
.

————————————————————————————————————————
6. TURN OFF PAGEFILE.
This is an extremely controversial optimization and does not improve performance whatsoever. It does, however, return to the user 3.5-4Gb of valuable ssd storage space. It is NOT recommended for typical users with less than 4Gb RAM that are not aware of their system and its RAM use. It is also not recommended without first watching RAM use closely for some time prior to this being done.

.
1. Right click on My Computer;
2. Select Properties;
3. Select Advanced System Settings;
4. Select the Performance tab and Advanced tab;
5. Select the Change box for virtual memory;
6. Un-check Automatically Manage Page File Size For All Drives;
7. Select No Paging File and click the set box; and
8. Select Yes to allow and restart.
————————————————————————————————————————
7. TURN OFF HIBERNATION.
Hibernation was a very useful program for hard drives as it enabled one to resume their work in a very quick time. It is less useful with ssds as they can load completely in as quick as 10-20 seconds which, in some cases, equals Hibernation. Disabling Hibernation will return 2.5Gb of valuable ssd storage space to the user.

1. Using the start menu search box type “cmd”;
2. Right click the cmd program and select Run as Administrator; and
3. In the command line type “powercfg -h off”.
This will take about 30 seconds it has finished once the command prompt reappears.
————————————————————————————————————————
8. TURN OFF WINDOWS WRITE-CACHE BUFFER FLUSHING…OR NOT
Turning Off Write-Cache Buffer Flushing may increase or decrease the performance of your drive and it is suggested that you perform benchmark tests with it checked and unchecked. It is reported to improve performance on OCZ drives, however, decreases the performance of Intel drives.

1. Right Click My Computer and select Properties;
2. Select Device Manager;
3. Select Disk Drives;
4. Right click the SSD and select Properties; and
5. Under the Performance tab check the box Turn off Windows write-cache buffer flushing on this device.
————————————————————————————————————————
9. DISABLE PREFETCH AND SUPERFETCH.

1. Type Regedit into the Start Menu box;
2: Select the file path:
“HKEY_LOCAL_MACHINE\SYSTEM\ CurrentControlSet\Control\SessionManager\Memory Management\PrefetchParameters”
3. Right click on both EnablePrefetcher and EnableSuperfetch;
3. Right click on both EnablePrefetcher and EnableSuperfetch;
4. Select modify on each of these to change the value from 1(or 3) to 0; and
5. Restart.
.
.
————————————————————————————————————————
10. DISABLE WINDOWS SEARCH AND SUPERFETCH.

1. Press Winkey + ‘R’ for Run Dialogue;
2. Type “services.msc” and press Enter;
3. Scroll to Superfetch, right click and select Properties;
4. In the drop down menu select Disabled and select Ok;
5. Scroll down further to find Windows Search, right click and select Properties;
6. Click the Stop box then use the drop down menu to Disable select Ok.
————————————————————————————————————————
11. ENABLE FASTER BOOT THROUGH MSGONFIG
This technique will remove the splash scree at start which will cut your boot time by 2-3 seconds. It is advised that the user not experiment with other options not described as it can have a negative effect on the OS.

1. Press Winkey + ‘R’ and type MSConfig;
2. Check the radio option for ‘No GUI Boot’
Use the start box type “msconfig”.
3. Apply.
Use the start box type “msconfig”.
3. Apply.
.
.
————————————————————————————————————————
12. TURN OFF MULTI-BOOT SELECTION.
This should not be done if the drive is being used to boot multiple operating systems off the same OS drive.

1. Right click My Computer and select Properties;
2. Select Advanced System Settings;
3. Select the Startup and Recovery setting box; and
4. Un-check the Time to Display List of Operating System box.
.
————————————————————————————————————————
13. DISABLE RECYCLE BIN.
This will assist in instant activation of trim upon delete for smaller files. By removing this feature it can seriously impend accidental deletions do not apply if you often accidentally delete incorrect files.

1. Right Click Recycle Bin;
2. Select the SSD;
3. Select Don’t move files to the Recycle Bin. Remove files immediately when deleted.
4. Select Apply.
.
.
.
.
————————————————————————————————————————
14. DECREASE SHUTDOWN TIME.
This particular optimization can result in the loss of data, if not saved, as it forces any running programs to shutdown immediately rather than in their own manner.

1. Type Regedit into the Start Menu Box;
2. Select the file path: “HKEY_LOCAL_MACHINE\SYSTEM\
CurrentControlSet\Control”
The last file is WaitToKillServiceTimeout.
3. Right Click and select Modify to change the value from 12000 to 1000. Restart.
NOTE: If you experience program hangups increase this to 5000 or so.
————————————————————————————————————————
15. VERIFY TRIM.
Verifying that TRIM is working is actually a next to impossible task which requires monitoring your computers activity closely as TRIM can take only a split second to complete. There is truly no way for the user to confirm that it is working. Verifying TRIM will confirm for the user that the TRIM commands are being sent from the software to the ssd. This, unfortunately, is the closest one will come without trying to catch it in action for that split second.

1. Using the Start Menu Search Box, Search CMD;
2. Right click the Cmd Program and select Run as Administrator;
3. In the command line type “fsutil behavior query DisableDeleteNotify”
If DisableDeleteNotify=0 TRIM is Enabled.
If DisableDeleteNotify=1 TRIM is Disabled.
If DisableDeleteNotify=1 TRIM is Disabled.
————————————————————————————————————————
16. POWER SETTINGS.
 1. Go to Control Panel;
2. Select System and Security;
3. Select Power Options and Click the drop down for Show Additional Plans;
4. Select the High Performance bubble to apply it;
5. Click Change Plan Settings for High performance;
6. Click Change Advanced Power Settings;
7. Click the hard disk drop down option;
8. Change Turn off hard disk after to 0 minutes (will display as never after applied);
 9. Select OK; and
10. Select Save Settings.
.
————————————————————————————————————————
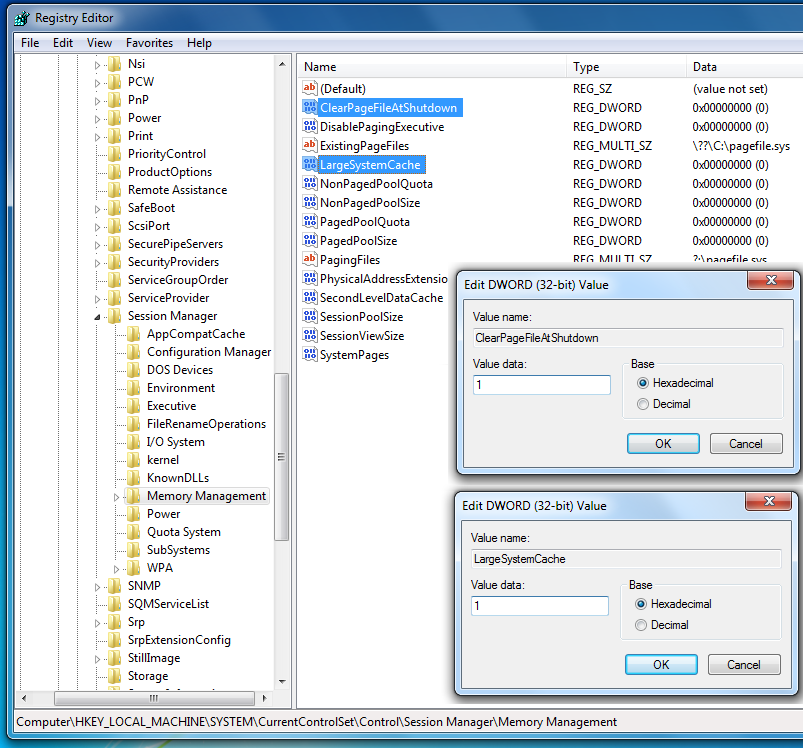
17. DISABLE ‘CLEARPAGEFILEATSHUTDOWN’
AND ‘LARGESYSTEMCACHE‘.

1. Type Regedit into the Start Menu box;
2. Select the file path:
HKEY_LOCAL_MACHINE\SYSTEM\ CurrentControlSet\Control\SessionManager\
MemoryManagement”
The 2nd and 5th files are ClearPageFileAtShutdown and LargeSystemCache.
3. Right click and select Modify on each of these to change the value from 1 to 0 and Restart.
3. Right click and select Modify on each of these to change the value from 1 to 0 and Restart.

————————————————————————————————————————
18. NTFS MEMORY USAGE & NTFS DISABLE NAME CREATION.

1. Type Regedit into the Start Menu box;
2. Select the file path:
“HKEY_LOCAL_MACHINE\SYSTEM\ CurrentControlSet\Control\FileSystem”
3. The 5th files is NtfsDisable8dot3NameCreation. Right click and modify to 1; and
4. The 11th file is NtfsMemoryUsage right click and modify to 2 and Restart.
4. The 11th file is NtfsMemoryUsage right click and modify to 2 and Restart.
No comments:
Post a Comment